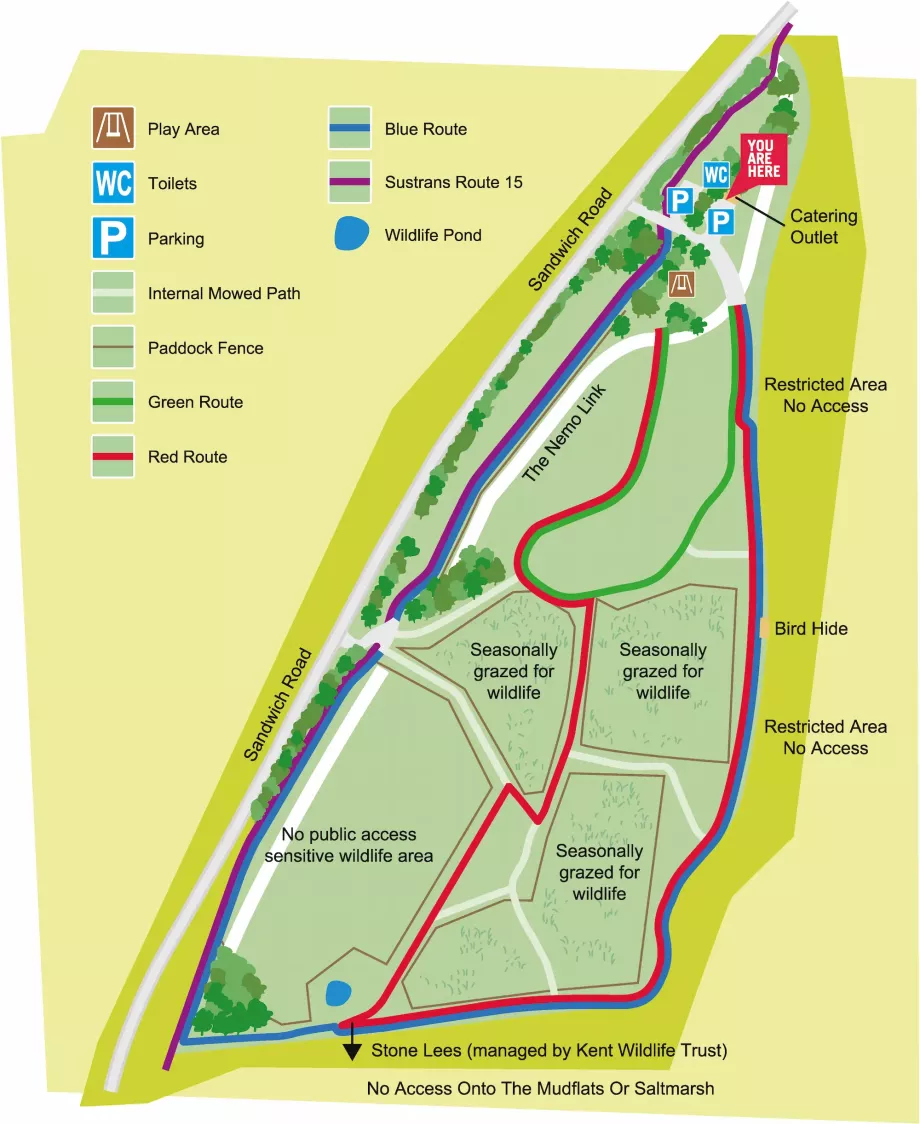
How to start an allotment – wildlife-friendly tips

How to start an allotment – wildlife-friendly tips

©️ Tom Marshall

So you want to start an allotment but have no idea how? We’ve got you covered. Check out our tips for getting stuck in and creating a space for crops and wildlife to thrive in.

How do allotments work? 

Allotments in the UK are small plots of land rented to individuals. Typically, they’re managed by local councils, but some are privately owned or managed by allotment associations. 

Tenants rent their plot under an agreement that outlines some rules and responsibilities, from plot maintenance and permitted activities to rent payments (which are typically paid annually). 

As for facilities, you can expect most allotments to have water access and pathways. Some have communal sheds, composting facilities, and even toilets. As the tenant, you would be responsible for bringing and taking care of your own tools, seeds, and supplies. Although some allotments are protected by gates or fences, there is no guarantee of absolute security.  

How to get an allotment 

If you’re looking for an allotment, there will typically be one or two options in your area – but expect the waiting lists to be long. You might get lucky and be bumped up the queue when others ask to be taken off the list or don’t respond when a plot is offered to them. 

Search online for ‘allotment near me’ or contact your local council. You’ll need to give a few details about yourself and where you live in order to join the waiting list. 

Sometimes, councils will ask new allotment holders to come for an induction session when they reach the top of the queue. 

Getting started with your allotment 

So, you’ve got your allotment plot – congrats! Have a small celebration now but save the big one for later; there’s work to be done first.  

The planning stage 

This is one of the most exciting bits of getting an allotment plot! Start to plan out the layout, including space for crops, paths, and wildlife-friendly areas. 

Two people standing over raised beds filled with flowers and vegetables in front of a block of flats.

©️ Abbey Wilkinson

Some questions to ask yourself: 

  • What is your goal with the allotment? Are you aiming to grow as much food as possible, or do you want a mix of vegetables and flowers? Do you want to create a space that supports local wildlife? 

  • How much time can you commit to it? How many hours per week can you dedicate to maintenance? Are you planning for daily or weekly visits, or will you need to plan for less frequent, but longer visits? 

  • How much work are you willing to put into maintaining your plot? Are you able to take on regular tasks like weeding, watering, and pruning, or do you need to consider a lower-maintenance approach? Would you think about using techniques like companion planting, mulching, and permaculture to reduce ongoing maintenance? 

  • What is your gardening experience? Are you a beginner or do you want to take on more of a challenge? Would you prefer a simple, low-maintenance design or are you ready for more complex gardening? 

  • What is the ideal layout of your plot? How will you arrange beds and paths to make the most of your space? Do you want a dedicated area for sitting back and enjoying your allotment? Is there enough room for everything you want to grow, including areas for wildlife-friendly ponds and borders? 

  • What is the condition of the soil? Will you need to spend time improving the soil with compost or otherwise? Are there any drainage issues on the plot? 

  • What crops and plants do you want to grow? Which species are suited to your local climate and soil? Are there any plants you could grow that will benefit local wildlife, like nectar-rich flowers? 

How to clear your allotment 

You will want to clear your allotment as soon as possible. The most ideal time to do this is in autumn and winter, before plants bounce back to life again in spring and take over. 

If you have quite a large plot and can only do one section at a time, a top tip is to cover the sections you can’t get to just yet with brown cardboard. This will help stop weeds from getting unwieldy. If you’re using this approach, you might like to clear one part and start seed-sowing there, before moving onto clearing the next. 

Before you can clear anything, though, you’ll need a plan for your garden waste. Ask the allotment site manager how this usually works – it may be the case that the council takes rubbish away. You might also have room for composting, which is a good idea for most allotment plots. 

What should you remove from your new allotment? 

Generally, you should try to remove only what you must. What we mean by this is the more you can leave for wildlife, the better. There may be insects and amphibians that call your plot home, and it’s nice to share it with them as much as possible – while still getting the best out of your space, of course.  

A bee on a drooping blue cornflower.

©️ Gavin Dickson

This could look like leaving a ‘wild border’ and only cutting back sprawling blackberry bushes, for example (after all, you might want those blackberries come late summer!). Any established trees should be left as is, unless they’re going to be significantly shading your plot (in which case, you can trim back certain branches). 

A few dandelions and nettles provide nectar, food sources, and habitats for our beloved bees, butterflies, and moths – all of which are lovely to have around, while benefiting the plants you grow. Ladybirds, for example, are a big fan of nettles AND they’ll eat those pesky aphids that threaten to cover bean plants. 

Your first harvest might be a dandelion tea, or a homemade organic nettle fertiliser – great for feeding any leafy greens. All this to say, not all ‘weeds’ are bad, and it’s worth considering what you can make room for alongside your sowing and planting.  

Do be careful, though, with perennial weeds like bindweed. It’s advisable not to compost invasive plants because they’ll just take over the compost area instead! The alternative is to put it in your green waste bin or burn it if you have an incinerator. Check out Liz Zorab’s video on clearing perennial weeds

Prepare the soil and any raised beds 

After you’ve cleared your allotment space, you need to prepare the soil. Healthy soil provides the foundation for a healthy garden, aiding plant growth, supporting beneficial organisms, and helping sustain local wildlife. 

Two hands holding peat-free compost.

©️ Gavin Dickson

You can – if you are able – go as far as to test the pH level and nutrient content of your soil. This will help determine what kinds of crops will grow best and what nutrients you might need to add in. For example, most crops are happy in neutral to alkaline soil, with a pH range of 6–7.5. Others, like brassicas, may need additional lime to help prevent clubroot if the soil is acidic.   

If your soil is compacted, loosen it with a garden fork to improve air cirulation, water infiltration, and root penetration.  

Next, enrich your soil with organic matter like compost, well-rotted manure, or leaf mould to enhance soil fertility and moisture retention. Compost also encourages earthworms, which contribute to a healthy, living soil ecosystem. Just keep in mind that creating healthy soil is a process you have to be patient with! 

Take a look at Huw Richards’ Practical Guide to Soil Health for more information here

Depending on the condition of the soil and what you want out of your plot, you might want to consider the benefits of putting in raised beds. Raised beds are a great solution if... 

  • Your plot consists of heavy or clay soil that waterlogs easily 

  • You want to be able to more easily control soil quality 

  • Your plot is compacted or you want to reduce the need for frequent digging 

  • Ease of access is important to you. 

To set them up, plan your layout and build with untreated wood, bricks, or recycled materials. Typically, you should aim for a bed height of 20-30cm – but if you’re planning on planting root crops like parsnips or carrots, consider a couple of deeper beds. 

Fill your raised beds with a mixture of organic matter, compost, and topsoil. 60% topsoil, 30% compost, 10% organic matter is a safe bet for a fertile and well-draining bed but the exact mix may vary based on what you plan to plant. 

What to plant in your allotment

What to plant in your allotment depends on your level of experience and requirements, but there are a few easy-to-grow veg, fruit, and herbs you might like to start with. The following plants are perfect for beginners, with good yields and low maintenance: 

  • Radishes and beetroot 

  • Lettuce, rocket, salad greens 

  • Spinach and chard 

  • Potatoes and carrots 

  • Onions and garlic 

  • Courgettes 

  • Beans amd peas 

  • Chives, mint, parsley, basil 

  • Strawberries 

Sunflower

Tony Spinks

Alongside your edible crops, it’s a good idea to also grow native wildflowers like cornflowers, oxeye daisies, and lavender – all of which attract pollinators and are relatively easy to grow. Sunflowers, too, provide nectar for pollinators in summer and seeds for birds in winter, while also acting as a natural trellis. 

Once you’ve decided on your key crops, look into companion planting – marigolds, for example, are great planted amongst your vegetables because they attract ladybirds and hoverflies which prey on pests. 

Tips for getting the most out of your allotment 

Support wildlife as you grow 

We’ve mentioned throughout this blog that we’re big fans of wildlife-friendly gardening – and it’s not for nothing! Not only do wildlife-friendly plots look pretty, but they attract beneficial critters and increase climate resilience while also doing wonders for the local environment. 

As much as possible, avoid chemicals in your allotment (as well as peat) and instead opt for organic and homemade fertilisers and pest control. Learn more about natural pest control and wildlife-friendly gardening here

A garden on a sunny day, with wildflowers against the blue sky, and a greenhouse in the back.

A summer day in Ellen's garden.

Compost and deadwood piles can make great homes for wildlife, so you can share in the pleasure of the fruits of your labour! You can read all about sharing with nature here

If you’re particularly keen on wildlife, you might like to record your wildlife sightings as your plot develops. Stick to pen and paper or try an app like iNaturalist to make note. 

Plant (and eat) seasonally 

There’s an idyllic vision we all succumb to of plucking fresh lettuce from your raised beds throughout July or ripe strawberries in June. But crops – and the weather – don't always play ball, and that’s OK. 

When your lettuce bolts in the summer heatwave, embrace it. Every month, week, and day at the allotment is a surprise – and you might get some happy accidents, too. 

Planting seasonally and intercropping is one of the best ways to avoid that crop disappointment. Try to be realistic about what will grow when, and don’t exclusively plant for a summer harvest – plan instead for harvesting as close to year-round as you can get.  

Water wisely 

Hoses and sprinklers are rare on allotments – expect to use dip tanks filled up from the mains instead. Rather than watering all of your plants sparsely, water them thoroughly on a rotation. 

Plan for crop rotation 

Crop rotation is the practice of systematically changing the crops grown in specific areas each season. By doing so, you reduce the risk of soil depletion, pests, and diseases – and, in turn, improve overall yield. Track your planting in a journal or notes document and adjust your crop rotation plan as time goes on. 

Sow your own way 

When you enter a community allotment, you may (or may not!) be greeted by the other tenants there. Many of them will have their own ideas about the best way of doing things, and you’re also likely to find conflicting advice online, too. It can be hard to know what the right thing to do is. 

Remember – it's your allotment plot and so long as you aren’t encroaching on anybody else’s space, harming wildlife, or breaking tenancy rules, you can do what you like with it. That includes experimenting with different methods to see what works best for you!  

Elderly women gardening

Penny Dixie

Enjoy your wildlife-friendly allotment! 

An allotment can bring endless joy and fulfillment – so dig in (or don’t, check out the ‘no dig’ method) and, when the time comes, relish the harvest. Don’t forget to take a moment to appreciate the fluttering of butterflies and the buzzing of bees that visit your plot, too. They’re more precious than ever these days. 

More resources 

Charles Dowding’s YouTube channel 

Huw Richards’ YouTube channel 

Liz Zorab’s YouTube channel 

RHS Allotment Guides 

Garden Organic Allotment Advice 

And, for more information from us about wildlife gardening, check out the blogs below.